Let me first begin by saying that my Mother would be very happy to see this drawing up on my blog. I drew it for her 23 years ago in my art class. She was surprised that I could draw so well, but looking back during my childhood, I remember she was able to draw just as well. I guess my own talent comes from her. You must excuse the crumpled condition of the paper as you view this. I had it rolled up in a storage tube made for paper of this kind in order to protect it and it was somewhat difficult to lay it out flat to take the picture. The paper is actually a light beige in color,(which may not show up on some screens) and the dress is a gauze or satin like material in pinks, blues, and purple colors to show that its white. I think that at the time I was attracted to the dress and all the folds in it and of course, her pose as she adjusts the satin ties to her shoe before getting up to perform her next dance.
My work in progress painting is finished. It was something new for me to show the work in stages and to post those stages on my blog. What I noticed and perhaps liked about doing this was the fact that I didn't have to rush to post a new painting right away and it allowed me to take more time to work on this one.
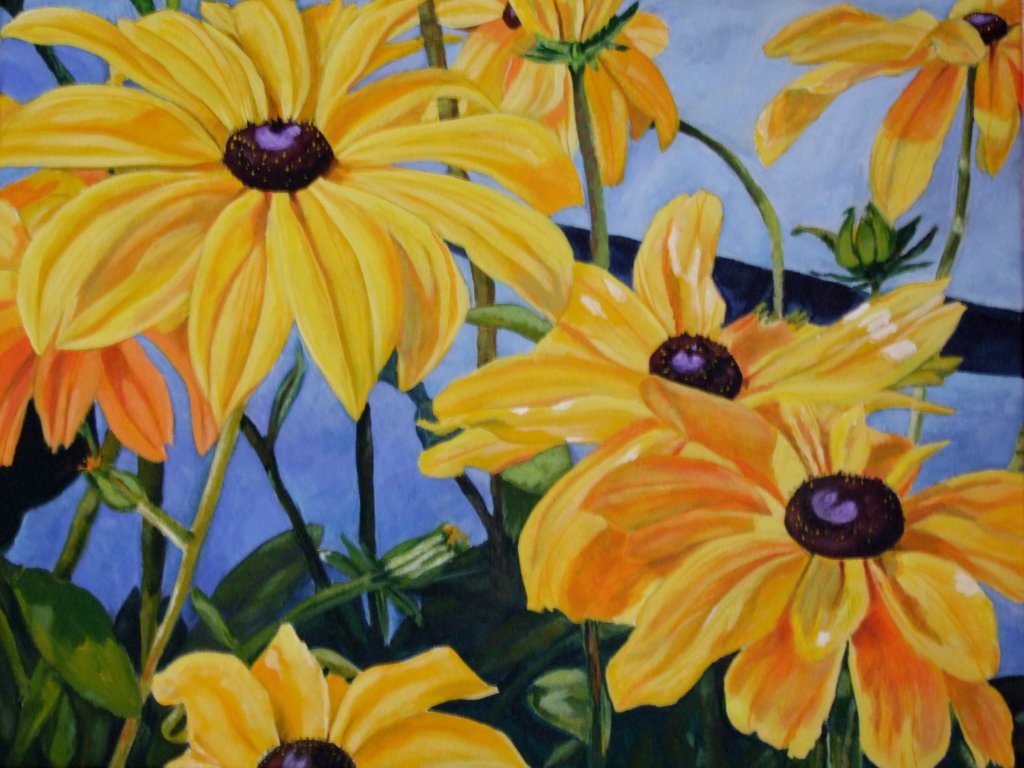
The flowers for this painting came from a photo I took of one of the large flower beds that is situated in front of the city hall building in the downtown core. Every spring, landscaping crews plant large arrays of beautiful flowers and plants in beds and pots all around the grounds. Its quite a splashy display of color every year.
Now that I've painted these flowers, I am looking forward to warmer spring weather already. I like this painting. Hope you do to.
I didn't think that I would be posting painting in progress 3 until later next week, but I had a little more time to work on it today. As you can see, I'm almost getting to the end. I still have to work in some of the details all around the painting after I finish the big flower. So far, I'm pleased with the way its turning out. You can see that the painting looks similar to the photo, which I hope I achieved that. My goal is to try to make it as interesting and realistic as I can get it. (the drawing classes I once took paid off here for sure!)
I look forward to posting my next post on this one and hopefully I will show the finished product.

Now that I have completed most of the foliage at the bottom, I am now working on the flowers and their stems. I'm using Cad. Yellow medium straight from the tube, no mixing with any other color. Then I paint the entire flower with it. This is the dark tone. I then add a little Titanium White to the mix, for the mid-tones. I only paint the areas of the petals where they seem to be a little lighter, judging by the photo. When that's done, I then paint the highlights. These are usually the areas where the light would be the brightest on the petals or that the sun is hitting certain areas of the petals. I don't try to use pure white because this is much too bright to apply as is, instead I always add just a hint of the Cad. Yellow mixture to the white, always keeping it basically a white but dulling it a little. The flowers have some orange in them and so that's what I used is Cad. Orange for the most darkest areas of the flowers. These areas are shaded and can be used for the folds and indentations on the petals. Lastly, I use a touch of Sap Green with a little of the Cad. Yellow mixture that I've already started and then I carefully find some of the shaded petals that are blocked by other flowers and apply it there. Some artists use a transparent blue or green color to glaze shaded areas but I didn't use that here. With the flower centers, I used Cad. Red medium and Mars Black mixed together. It makes a wonderful reddish brown color. Then I used Dioxazine Purple mixed with a little white for those tiny highlighted section in the middle of the flower centers. Dabbed the centers with tiny dots of Cad. Yellow to show the pollen and that is it for the flowers. It won't be for another few days or so before I post #3, to allow me to finish this painting. I hope you'll stay tuned till then.

I thought I would start the year off by doing something that I don't normally do and that is, to show a painting in stages, so that viewers can see my approach and techniques that I use. So many artists now a days are showing their work in stages like this on their blogs. So here I am giving it a try. To begin with, I usually do an underpainting with most of my paintings, but in this case, I didn't. I decided to draw the image first which came from a photo I took last September of flowers in a flower bed. I cropped the image several times on my computer, before deciding on the best composition or one that I found most pleasing to look at. I use a stay-wet pallet for my acrylics and I tend to squeeze out the paint at random on the surface and do all the mixing there as well. My pallet after a while looks a mess! I then always start with the background first and move forward on the canvas to the front by doing it in layers. As you can see, all the background is done and now I am working on the foliage at the back and moving forward towards the bottom front. Later I will start on the flowers by painting the smaller ones first and work towards doing the large one last. As I paint, I usually apply the dark tones first, then mid-tones and lastly the highlights. I try to bear in mind, the principles for building a painting, but quite frankly, if I only have a few of them down then I know I have a reasonably good enough painting. I then do all the details at the end of the painting. Sometimes I sign my paintings and other times I don't depending on the image, I'll sign the back instead. ( I have seen some paintings spoiled because of the signature on it.) I then apply a few coats of satin or matte varnish mixed with water and carefully apply it with a varnish brush onto the painting to protect it. And that's it.
Stay tuned for more progress on this painting!
This Salmon colored-rose drawing I had was in my collection of pencil drawings. Upon seeing it recently, I decided to post it. Traditionally, the rose is considered the flower of love. I read that salmon or orange roses signify passion and energy. They express intense desire, pride and fervor. A single orange rose says, "I am proud of you." As I was considering its meaning, I thought it would be a fitting tribute to all our past accomplishments and our future ones as artists. Enjoy the New Year!